top of page
Search
Tatiana Slepukhin-Zamachnaia

In my previous post, I showed you how to reveal user identity in Insider Risk Management (IRM) while maintaining user privacy through anonymization.


But today I’d like to talk about my discovery of a significant issue that could compromise anonymization in certain scenarios.


I am not going to repeat myself as everything you need to know about user anonymization is in the previous post. As a reminder, here is an example of how IRM hides the user identity:


The Anonymization Flaw


IRM reveals user identity by exposing OneDrive URL.

You can observe this anonymization issue when inspecting user activity through Alerts or Cases.  


The exposure of the user identity happens for some activities, such as when a file is shared externally.  

Here’s what happens: When you browse user activity in Activity Explorer, you may encounter a "File shared externally from SPO". Typically, all activities are anonymized to protect the user’s identity. However, in this case, the Activity Details reveal the OneDrive URL where the file was stored before being shared externally.


The issue? This URL contains the user's first and last name.

Example:

The following OneDrive URL provided in the user activity:

This URL clearly includes the user’s name, in this case, "Jane Jones," making it obvious who owns the OneDrive and, therefore, who is under investigation. The generic format of a OneDrive URL typically looks like this:

Where [first_last] represents the user’s first and last name.


Because of this structure, any alert-generating activity involving OneDrive, such as sharing files from OneDrive, will inadvertently reveal the user's identity.


This defeats the purpose of anonymization within IRM.

Important Note: Activities such as downloading files to OneDrive do not display the OneDrive URL in the activity logs. Therefore, only specific actions, like sharing files, are affected by this issue.

Design Flaw or Bug?

This raises an important question: Is this behavior by design, or is it a bug? To me, this is clearly a bug. At this point in the investigation, there is no need to reveal the specific URL. It would be sufficient to indicate that the file was shared from the user's OneDrive without exposing the full URL that includes the user's name. This would maintain the integrity of the anonymization process while still providing the necessary context for the investigation.

Why This Matters


This flaw is particularly concerning because it undermines the very purpose of anonymization in Insider Risk Management. The aim is to prevent bias and ensure privacy until there’s enough evidence to justify revealing the user’s identity. However, with this issue, even well-intentioned investigators might accidentally discover who the user is, simply by following the trail in the Activity Details in Alerts, even before IRM Case is created and assigned.

Potential Risks and Repercussions


Revealing a user’s identity inadvertently, as this bug does, could have significant repercussions, especially if your organization has strict HR policies in place that prohibit revealing usernames prematurely. Such policies are typically designed to protect employee privacy and ensure that any investigation is conducted fairly and without bias.


Exposing a user’s identity too early could lead to a range of issues, including:

  1. Violation of Privacy Rights: Many organizations have strict policies around employee privacy, particularly during investigations. Accidentally revealing a user's name could violate these policies and potentially expose the organization to legal risks.

  2. Bias in Investigations: Knowing the identity of a user too early can introduce bias into the investigation process. Investigators might treat the case differently based on who the user is, which can undermine the fairness and objectivity that anonymization is supposed to ensure.

  3. HR Repercussions: If the user identity is revealed, and it turns out to be a false alarm or a minor issue, this could still lead to unwarranted HR actions, such as unnecessary disciplinary measures or damage to the employee’s reputation.

  4. Trust Issues: Employees rely on the organization's commitment to privacy. If it becomes known that anonymization can be easily broken, it could erode trust in the system, making employees less likely to report concerns or cooperate with investigations.


Mitigation


This bug is more than just a technical glitch—it has real implications for your organization’s ability to manage insider risk while maintaining trust and compliance with privacy policies. Ensuring that anonymization functions as intended is crucial not only for effective investigations but also for upholding the principles of fairness and privacy within your organization.


I will be submitting this issue to Microsoft and hopefully, they will address it in a timely fashion.


Meanwhile, consider the following actions:


  1. Awareness: If you’re using IRM, be aware and cautious of this potential breach of anonymization when reviewing activities involving OneDrive.

  2. Governance: Strengthen your organization's governance policies to emphasize the importance of reporting such issues and ensure that all stakeholders are informed about potential risks related to anonymization. While direct mitigation steps may be limited, clear communication and robust governance can help manage and mitigate risks.


Also, keep an eye on this issue—if Microsoft addresses it soon enough, you may not need to implement a full mitigation plan.


Regularly check for updates, and if you have an alert generated for the activity that exposes the OneDrive URL, make sure to review the activity details to see if the username is still visible in the URL.


Don’t forget to check this blog or subscribe to my YouTube channel— I’ll continue to monitor this issue; I will provide updates as they become available.   Watch the video on this subject that shows this issue in action:


Tatiana Slepukhin-Zamachnaia

Updated: Aug 19, 2024

Read the article below or watch YouTube video:


Why Anonymizing Users Matters


When it comes to Insider Risk Management (IRM), one of the key features is the anonymization of users. But why is this important? Let’s break it down.

First off, respecting user privacy is crucial. Anonymizing users helps protect their identity during the investigation process. This isn’t just about being polite; it’s about avoiding unnecessary HR repercussions that could arise if sensitive information gets out too early. Privacy is a big deal, and anonymization helps keep it intact during alert investigations.

The second reason is to rule out bias. Think about it: if someone is investigating a case and they see the name of a user who happens to be their buddy or a well-known coworker, they might struggle to believe that such a nice person could be involved in something shady. This could lead to the investigator, or even the person managing the alerts, being more likely to dismiss the case or not escalate it properly.

On the flip side, imagine if a big boss triggers an alert. The information worker might hesitate to investigate because, well, who wants to poke around the activities of someone so high up? There could be fear of repercussions or the assumption that someone in that position has "special privileges," leading to the alert being ignored or the case being dismissed.

In both scenarios, anonymization helps ensure that investigations are conducted fairly and objectively, without personal connections or organizational hierarchy clouding judgment.


Setting Up User Anonymization in IRM

To scramble user identities, you need to go to the Privacy option in IRM Settings. This is a global setting that applies to the entire Insider Risk Management surface without exceptions. The pseudonymized version of the username will be shown across all IRM alerts, cases, and everywhere else.

Note that anonymization is a default setting.  


Anonymization in Action


Now, let’s take a closer look at how anonymization functions within Insider Risk Management.


Below, you’ll find screenshots that show the anonymized user information across IRM:


Users:

Alerts:
Cases:
Case:

User Details:

As you can see, all user identities are replaced with pseudonyms, ensuring that no real names are visible during these stages of investigation.


But this leads to a common question: How do we actually find out who the user is if we confirm they’re a rogue insider?

Revealing User Identity


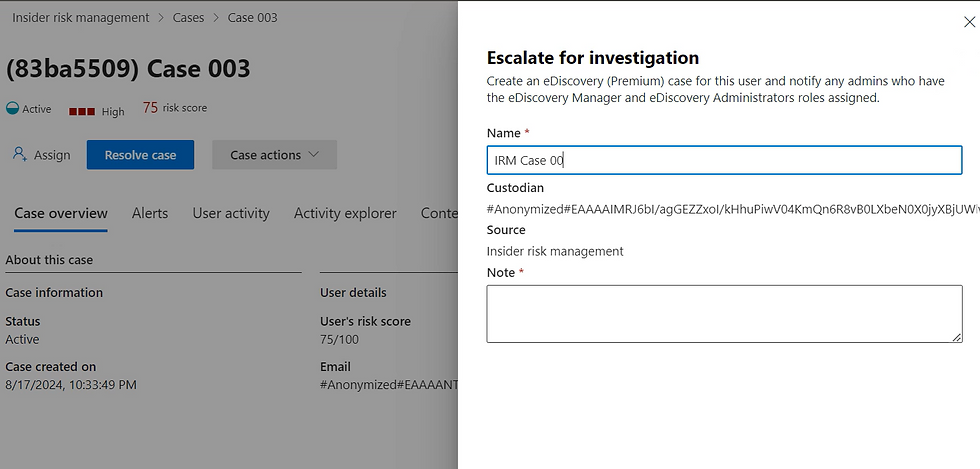
Once you’ve confirmed that a user might be involved in potentially harmful activities, the next step is to uncover their true identity. In Insider Risk Management, this isn’t done lightly; to reveal the user's identity, you must escalate the case. Escalation of the case creates an investigation case in eDiscovery (Premium).


Escalate Case

Navigate to the IRM Case that you need to escalate.

Under the "Case actions" menu select "Escalate for investigation":

Fill Out the eDiscovery Case Details 

In the fly-out panel, you’ll need to enter an eDiscovery Case name and notes, both of which are mandatory fields.

Note that the source of the eDiscovery Case will be IRM.


Once the case is escalated, the eDiscovery (Premium) case will be created for the user, allowing you to perform detailed content searches and track all user activities that IRM does not cover.


Notification to eDiscovery Managers and Admins 

eDiscovery Managers and eDiscovery Admins will be notified about the case creation, ensuring that the appropriate team is aware and ready to take the next steps.

In eDiscovery, once a case is created, access to that case is typically controlled by eDiscovery Managers or eDiscovery Admins. These roles have the ability to assign permissions and add other users to the case. The person who was the owner of the case in IRM does not automatically get access to the eDiscovery case unless they are specifically added by an eDiscovery Manager or Admin.

So, only eDiscovery Managers or Admins can assign people to the case in eDiscovery, and access is not automatically granted to the IRM case owner.


Find IRM Case in eDiscovery

Navigate to Discovery (Premium) and locate the eDiscovery Case that you created in the previous step:


Select "Data Source" Tab.

Revealing the user


You can now see the user name under the "Source name" column.

In this example, the rogue employee is revealed to be... Oskar the Grouch!


Now, before you think I'm investigating a beloved Sesame Street character, let me clarify—this is actually the name of my 120-pound guard dog. And while Oskar might be great at keeping intruders out of the house, I can assure you he's not involved in any insider threats!


P.S. I found the bug in User Anonymization that accidentally reveals user identity for select user activities!

Check the following blog post to learn more.

Tatiana Slepukhin-Zamachnaia

Updated: Aug 25, 2024


The Problem: “Invisible” Retention Policies


Retention Policies are essential for data compliance, but they’re often invisible. When working in a SharePoint site or managing content in OneDrive, users and administrators can’t see which retention policies were applied.


Unlike published retention labels, these policies don’t provide any visible indication on the sites or items they govern, leading to confusion and a lack of transparency.


The Additional Challenge: Difficult Access to Policy Details in Microsoft Purview


Adding to this issue is the difficulty in accessing retention policy details within Microsoft Purview. Administrators must click through multiple screens to view most properties of a policy.


Want to see which sites or groups a policy applies to? You’ll have to dig into the “Edit” mode, then click through each location individually. This process is time-consuming, especially in environments with a large number of policies and locations.


A Questionable Rationale: "User-Friendly" Design?


Some experts suggest that this invisibility is part of a "user-friendly" design, intended to keep users from being overwhelmed by complex compliance rules. However, this rationale can be counterproductive.


Users encountering unexpected behaviours—like documents reappearing in the Preservation Hold Library after deletion (for users with appropriate permissions) —may find the system confusing rather than reassuring. Instead of enhancing the user experience, this invisibility can create frustration when users can't easily understand the rules that govern their content.


A more transparent approach, where retention policies are visible but not modifiable by end-users, could strike a better balance between user-friendliness and transparency.


A Limited Tool: Policy Lookup in Microsoft Purview


Microsoft Purview does offer a "Policy Lookup" feature within the Records Management portal. This tool allows you to search for retention policies applied to a specific User, SharePoint Site, or M365 Group by entering the exact matching string (e.g., site URL or group name).


However, even this tool has its limitations. The information it provides is restricted to Scope Types, Applications, Last Modified, and Date Created—far from the detailed, actionable insights administrators need. And you have to enter the URL of each site that you want to check. You can only search for one item at a time.


The Solution: A PowerShell Script for Visibility and Ease of Access


To address these issues, I developed a PowerShell script that automates the process of retrieving and reporting on retention policies across your Microsoft 365 environment. This script provides a clear and detailed view of where policies are applied, what specific properties they have — without the need for excessive clicking and manual checks.


What the Script Covers (and What It Doesn’t)


The script retrieves retention policies across your Microsoft 365 environment and generates a detailed report saved in a CSV file. This report provides insights into which policies are applied to specific locations and outlines their key properties.


Once the script generates the CSV file, you can easily load it into Excel for further analysis. This is particularly useful if you’re dealing with a large-scale implementation where the sheer number of retention policies could be overwhelming.


Excel’s powerful data filtering, sorting, and pivot table features make it easy to break down the data, identify patterns, and gain insights that might be difficult to see in a simple list format.


The screenshots of the excel file are below. I generated the report in my demo Tenant, which is nearly empty. But it is still sufficient to show the attributes that are captured:


What It Reports On:


  • Retention Policies (Remember that Retention Policies are applied to the containers).

  • Auto-Apply Label Policies: It also reports on policies that automatically apply retention labels to content based on specific criteria.


What It Doesn’t Report On:


  • Label Publishing Policies: The script doesn’t report on label publishing policies that push labels to sites, as these labels become self-evident once applied. Administrators and users can easily see the labels in use without needing additional reporting.


Here’s a quick overview of how the script works:


  • Shows Where Policies Are Applied: The script lists all locations as well as the location exceptions, such as the URLs of SharePoint sites or the names of Modern Groups affected by the policies, making it clear which locations are under governance.

  • Provides Policy Details: It outputs key details about each policy, including the retention duration, actions, and any exceptions.

  • Customizable: You can easily modify the script to add more properties or adjust the output to meet your specific needs.


Connecting to MS Purview


In order to run any script from this article, you need to connect to Compliance Center: Make sure that ExchangeOnlineManagement Module is installed or install it:

Install-Module -Name ExchangeOnlineManagement 

Import the Module:

Import-Module ExchangeOnlineManagement

Connect to Compliance Center:

Connect-IPPSSession -UserPrincipalName Name@Tenant.onmicrosoft.com


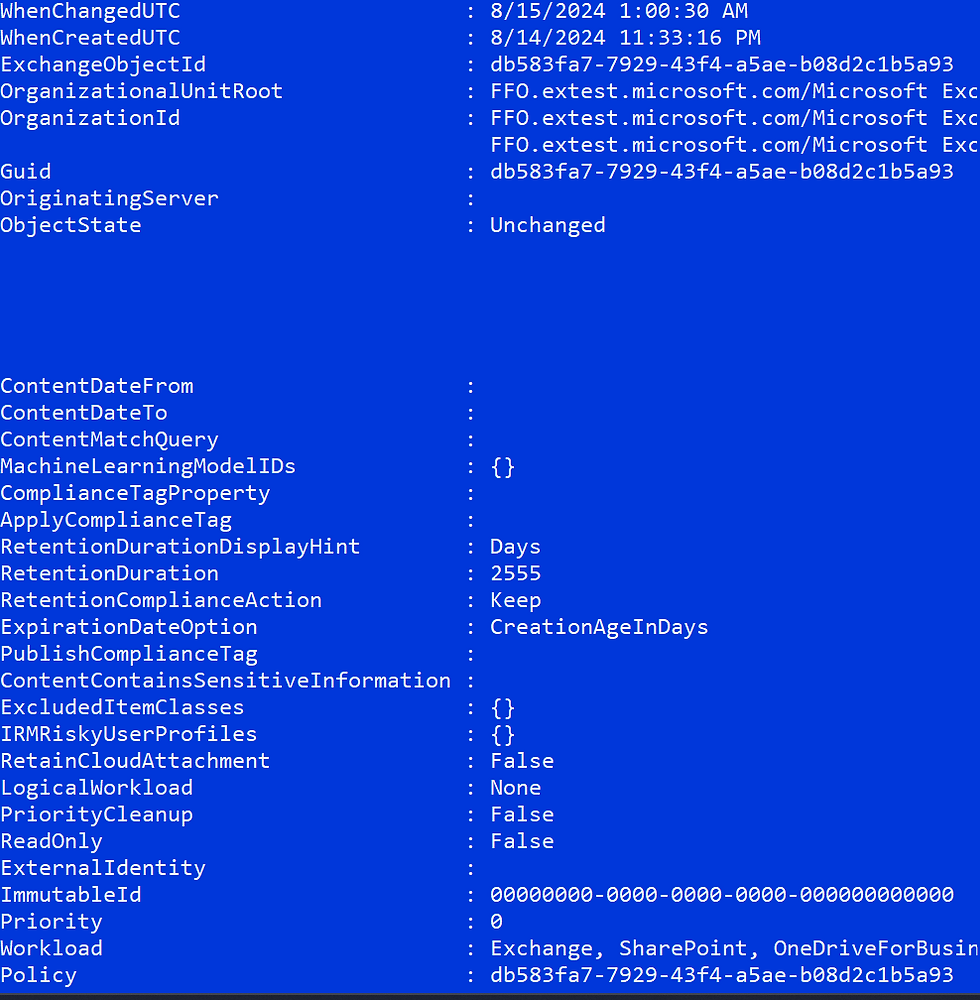
Exploring Retention Policy Properties


To explore additional available properties of a retention policy, you can use the following PowerShell script:

# Lists available properties of the Retention Policy
$PolicyName = "M365 Groups"

# Retrieve the policy by name
$Policy = Get-RetentionCompliancePolicy -Identity $PolicyName -DistributionDetail

# Output all properties of the policy
$Policy | Format-List -Property *

# Retrieve all associated rules for this policy
$Rules = Get-RetentionComplianceRule -Policy $PolicyName
# Output all properties of the rules associated with the policy

ForEach ($Rule in $Rules) {
	$Rule | Format-List -Property *
}

This script allows you to inspect all the available properties of a specific retention policy, making it easier to identify additional attributes you may want to include in your custom reports. By understanding these properties, you can enhance your reporting scripts to capture more detailed information, tailoring the output to your specific needs.


How to Get It


You can find the script on GitHub here.


While this script has been tested on most locations and attributes, it has not been fully tested with Teams policies and a few specific properties. I’ve run it successfully in my Demo Tenant, but I can’t guarantee how scalable it will be when applied to a very large Tenant.


Therefore, please use it at your discretion and always test it first in a controlled environment.


Nevertheless, this script serves as a strong starting point for gaining better visibility into your retention policies.


Understanding RetentionRuleTypes and Customizing Your Script


RetentionRuleTypes property plays a crucial role in identifying the type of each policy. Understanding these values is key to customizing your script and focusing on the policies that matter most to your scenario.


Here are the possible values for RetentionRuleTypes:

  • Publish: Represents Label Publishing Policies. These policies are designed to make labels available for manual application by users within the Microsoft 365 environment.

  • Apply: Refers to Auto-Apply Label Retention Policies. These policies automatically apply specific labels to content based on predefined criteria.

  • Default: Indicates a "standard" Retention Policy. These are the general retention policies applied across various locations in your Microsoft 365 environment, often setting the baseline for data retention and deletion.

Customizing the Script to Filter Policies by Type

The script excludes Publish RetentionRuleTypes of the policies, since they are already visible in the UI. This is achieved with the following line:

$Policies = Get-RetentionCompliancePolicy -DistributionDetail -RetentionRuleTypes | Where-Object { $_.RetentionRuleTypes -ne "Publish" }

However, if you wish to target specific types of policies, you can easily modify this line using the -eq operator for exact matches. For example:


To retrieve only "standard" Retention Policies (Default):

$Policies = Get-RetentionCompliancePolicy -DistributionDetail -RetentionRuleTypes | Where-Object { $_.RetentionRuleTypes -eq "Default" }

To retrieve only Auto-Apply Label Retention Policies (Apply):

$Policies = Get-RetentionCompliancePolicy -DistributionDetail -RetentionRuleTypes | Where-Object { $_.RetentionRuleTypes -eq "Apply" }

But if you need to retrieve Policies that publish labels to the workloads (Publish):

$Policies = Get-RetentionCompliancePolicy -DistributionDetail -RetentionRuleTypes | Where-Object { $_.RetentionRuleTypes -eq "Publish" }

Whether you’re focusing on standard retention policies, auto-apply label policies, or something else, this approach gives you full control over the data you extract and analyze.


If you just want to view all Policies along with RetentionRuleTypes, use the following script:


# Retrieve all retention policies from the tenant with RetentionRuleTypes
$Policies = Get-RetentionCompliancePolicy -DistributionDetail -RetentionRuleTypes
# Process each policy and create a custom object
$PolicyOutput = $Policies | ForEach-Object {[PSCustomObject]@{
	Name = $_.Name
	RetentionRuleTypes = $_.RetentionRuleTypes -join ", "
	}
}
# Output the results in a table and order by RetentionRuleTypes
$PolicyOutput | Sort-Object RetentionRuleTypes | Format-Table Name, RetentionRuleTypes -AutoSize

Here is an output when I run the script in my demo Tenant:


bottom of page