top of page
Search
Tatiana Slepukhin-Zamachnaia

You may have heard that you can restore a SharePoint Library or read an article mentioning this option. But when you try to find it, you realize it's not available. In this article, I'll show you how to locate this option.

Here is a screenshot of the library that I messed up, and now I need to restore this entire Library. Let’s go to the settings and look at the menu. Take a look at the 'Library Settings' option—there’s nothing there. The 'Restore this Library' option is supposed to appear right below 'Library Settings,' but it is missing.

Now watch this:

We click on 'Library Settings' to open the settings.

Then click “More library settings”.


The settings page opens, but we won’t find our option here either. Instead, we’ll locate our library in the left panel—it’s 'Version Demo 2'—and navigate back to it. Let’s click on it.


We’re now back in the library where we started. But this time, if we go to the settings, the 'Restore this library' option has appeared right under 'Library Settings.'


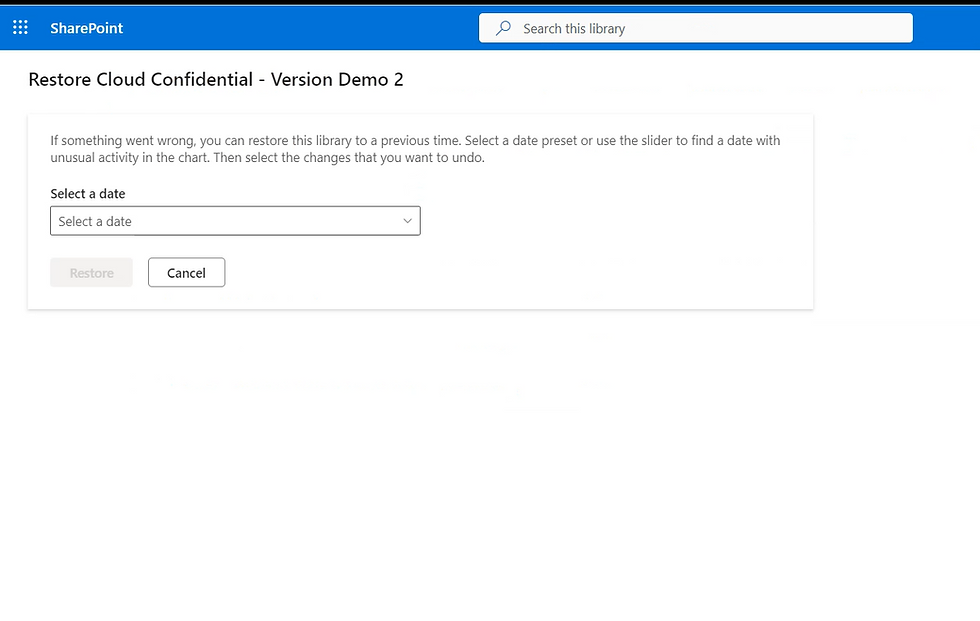
Let’s select 'Restore this library,' and as you can see, we’re now on the restore page.


If you decide to restore the library later and click Cancel, when you return to the library, you’ll have to go through the same acrobatics we just did to navigate back to the 'Restore' page. As you will see, the 'Restore this library' option has disappeared again.


If you do it one more time—notice that this behavior is consistent. You’ll have to use this workaround every time you need to restore the library, unless Microsoft fixes it.


Now that you know how to find this option, I caution you to use it carefully until you fully understand how it works. I’m preparing an article where I’ll show you how easy it is to mess up a library and lose all your files if you're not mindful of some quirks the Restore option has.  


Watch the video that shows this behavior step-by-step:


Tatiana Slepukhin-Zamachnaia

In my previous post, I showed you how to reveal user identity in Insider Risk Management (IRM) while maintaining user privacy through anonymization.


But today I’d like to talk about my discovery of a significant issue that could compromise anonymization in certain scenarios.


I am not going to repeat myself as everything you need to know about user anonymization is in the previous post. As a reminder, here is an example of how IRM hides the user identity:


The Anonymization Flaw


IRM reveals user identity by exposing OneDrive URL.

You can observe this anonymization issue when inspecting user activity through Alerts or Cases.  


The exposure of the user identity happens for some activities, such as when a file is shared externally.  

Here’s what happens: When you browse user activity in Activity Explorer, you may encounter a "File shared externally from SPO". Typically, all activities are anonymized to protect the user’s identity. However, in this case, the Activity Details reveal the OneDrive URL where the file was stored before being shared externally.


The issue? This URL contains the user's first and last name.

Example:

The following OneDrive URL provided in the user activity:

This URL clearly includes the user’s name, in this case, "Jane Jones," making it obvious who owns the OneDrive and, therefore, who is under investigation. The generic format of a OneDrive URL typically looks like this:

Where [first_last] represents the user’s first and last name.


Because of this structure, any alert-generating activity involving OneDrive, such as sharing files from OneDrive, will inadvertently reveal the user's identity.


This defeats the purpose of anonymization within IRM.

Important Note: Activities such as downloading files to OneDrive do not display the OneDrive URL in the activity logs. Therefore, only specific actions, like sharing files, are affected by this issue.

Design Flaw or Bug?

This raises an important question: Is this behavior by design, or is it a bug? To me, this is clearly a bug. At this point in the investigation, there is no need to reveal the specific URL. It would be sufficient to indicate that the file was shared from the user's OneDrive without exposing the full URL that includes the user's name. This would maintain the integrity of the anonymization process while still providing the necessary context for the investigation.

Why This Matters


This flaw is particularly concerning because it undermines the very purpose of anonymization in Insider Risk Management. The aim is to prevent bias and ensure privacy until there’s enough evidence to justify revealing the user’s identity. However, with this issue, even well-intentioned investigators might accidentally discover who the user is, simply by following the trail in the Activity Details in Alerts, even before IRM Case is created and assigned.

Potential Risks and Repercussions


Revealing a user’s identity inadvertently, as this bug does, could have significant repercussions, especially if your organization has strict HR policies in place that prohibit revealing usernames prematurely. Such policies are typically designed to protect employee privacy and ensure that any investigation is conducted fairly and without bias.


Exposing a user’s identity too early could lead to a range of issues, including:

  1. Violation of Privacy Rights: Many organizations have strict policies around employee privacy, particularly during investigations. Accidentally revealing a user's name could violate these policies and potentially expose the organization to legal risks.

  2. Bias in Investigations: Knowing the identity of a user too early can introduce bias into the investigation process. Investigators might treat the case differently based on who the user is, which can undermine the fairness and objectivity that anonymization is supposed to ensure.

  3. HR Repercussions: If the user identity is revealed, and it turns out to be a false alarm or a minor issue, this could still lead to unwarranted HR actions, such as unnecessary disciplinary measures or damage to the employee’s reputation.

  4. Trust Issues: Employees rely on the organization's commitment to privacy. If it becomes known that anonymization can be easily broken, it could erode trust in the system, making employees less likely to report concerns or cooperate with investigations.


Mitigation


This bug is more than just a technical glitch—it has real implications for your organization’s ability to manage insider risk while maintaining trust and compliance with privacy policies. Ensuring that anonymization functions as intended is crucial not only for effective investigations but also for upholding the principles of fairness and privacy within your organization.


I will be submitting this issue to Microsoft and hopefully, they will address it in a timely fashion.


Meanwhile, consider the following actions:


  1. Awareness: If you’re using IRM, be aware and cautious of this potential breach of anonymization when reviewing activities involving OneDrive.

  2. Governance: Strengthen your organization's governance policies to emphasize the importance of reporting such issues and ensure that all stakeholders are informed about potential risks related to anonymization. While direct mitigation steps may be limited, clear communication and robust governance can help manage and mitigate risks.


Also, keep an eye on this issue—if Microsoft addresses it soon enough, you may not need to implement a full mitigation plan.


Regularly check for updates, and if you have an alert generated for the activity that exposes the OneDrive URL, make sure to review the activity details to see if the username is still visible in the URL.


Don’t forget to check this blog or subscribe to my YouTube channel— I’ll continue to monitor this issue; I will provide updates as they become available.   Watch the video on this subject that shows this issue in action:


Tatiana Slepukhin-Zamachnaia

Updated: Aug 19, 2024

Read the article below or watch YouTube video:


Why Anonymizing Users Matters


When it comes to Insider Risk Management (IRM), one of the key features is the anonymization of users. But why is this important? Let’s break it down.

First off, respecting user privacy is crucial. Anonymizing users helps protect their identity during the investigation process. This isn’t just about being polite; it’s about avoiding unnecessary HR repercussions that could arise if sensitive information gets out too early. Privacy is a big deal, and anonymization helps keep it intact during alert investigations.

The second reason is to rule out bias. Think about it: if someone is investigating a case and they see the name of a user who happens to be their buddy or a well-known coworker, they might struggle to believe that such a nice person could be involved in something shady. This could lead to the investigator, or even the person managing the alerts, being more likely to dismiss the case or not escalate it properly.

On the flip side, imagine if a big boss triggers an alert. The information worker might hesitate to investigate because, well, who wants to poke around the activities of someone so high up? There could be fear of repercussions or the assumption that someone in that position has "special privileges," leading to the alert being ignored or the case being dismissed.

In both scenarios, anonymization helps ensure that investigations are conducted fairly and objectively, without personal connections or organizational hierarchy clouding judgment.


Setting Up User Anonymization in IRM

To scramble user identities, you need to go to the Privacy option in IRM Settings. This is a global setting that applies to the entire Insider Risk Management surface without exceptions. The pseudonymized version of the username will be shown across all IRM alerts, cases, and everywhere else.

Note that anonymization is a default setting.  


Anonymization in Action


Now, let’s take a closer look at how anonymization functions within Insider Risk Management.


Below, you’ll find screenshots that show the anonymized user information across IRM:


Users:

Alerts:
Cases:
Case:

User Details:

As you can see, all user identities are replaced with pseudonyms, ensuring that no real names are visible during these stages of investigation.


But this leads to a common question: How do we actually find out who the user is if we confirm they’re a rogue insider?

Revealing User Identity


Once you’ve confirmed that a user might be involved in potentially harmful activities, the next step is to uncover their true identity. In Insider Risk Management, this isn’t done lightly; to reveal the user's identity, you must escalate the case. Escalation of the case creates an investigation case in eDiscovery (Premium).


Escalate Case

Navigate to the IRM Case that you need to escalate.

Under the "Case actions" menu select "Escalate for investigation":

Fill Out the eDiscovery Case Details 

In the fly-out panel, you’ll need to enter an eDiscovery Case name and notes, both of which are mandatory fields.

Note that the source of the eDiscovery Case will be IRM.


Once the case is escalated, the eDiscovery (Premium) case will be created for the user, allowing you to perform detailed content searches and track all user activities that IRM does not cover.


Notification to eDiscovery Managers and Admins 

eDiscovery Managers and eDiscovery Admins will be notified about the case creation, ensuring that the appropriate team is aware and ready to take the next steps.

In eDiscovery, once a case is created, access to that case is typically controlled by eDiscovery Managers or eDiscovery Admins. These roles have the ability to assign permissions and add other users to the case. The person who was the owner of the case in IRM does not automatically get access to the eDiscovery case unless they are specifically added by an eDiscovery Manager or Admin.

So, only eDiscovery Managers or Admins can assign people to the case in eDiscovery, and access is not automatically granted to the IRM case owner.


Find IRM Case in eDiscovery

Navigate to Discovery (Premium) and locate the eDiscovery Case that you created in the previous step:


Select "Data Source" Tab.

Revealing the user


You can now see the user name under the "Source name" column.

In this example, the rogue employee is revealed to be... Oskar the Grouch!


Now, before you think I'm investigating a beloved Sesame Street character, let me clarify—this is actually the name of my 120-pound guard dog. And while Oskar might be great at keeping intruders out of the house, I can assure you he's not involved in any insider threats!


P.S. I found the bug in User Anonymization that accidentally reveals user identity for select user activities!

Check the following blog post to learn more.

© 2024 Cloud Confidential Inc.

bottom of page